| Danny earned £35 in eM-4 credit |
![]()
|
|
| AN ONGOING NEWSLETTER | September 2006 |
|
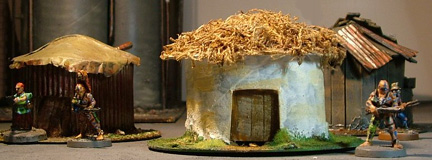
While most near future shacks tend to be square or rectangular in shape I wanted to be different. So I made some round huts. But that's not why they say I'm different....
Makes 3 to 4. Take a Pringles tube and a saw. Cut the tube into lengths roughly 40mm to 50mm long. This should give at least three to four sections. Cut any desired doors and windows into the tube sections. Have a care with the windows as they can be tricky. Rough up the surfaces of the CD’s with a bit of sandpaper, and glue the tubes to the CD’s. Add doors and shutters to the inside of the tubes before fixing the roofs in place. Use a CD as a template to cut a circle fron the cereal packet, marking the centre point. Cut from the edge to the centre point, and overlap the edges to form the circle into a cone. Place the cone on top of the hut and trim until you are happy with the overhang. Glue it into place, and you have your basic hut. Now you can add detail. Hut 1:
The roof is covered with moss, and there is a chimney made from a drinking straw. The walls are textured with a mixture of two parts PVA glue to one part water, plus sand . (Two or three coats may be needed.) I painted them white, dry-brushed with ivory. |
Hut 2:
The roof was covered with tissue paper (do not use toilet paper as it will disintegrate)., and a chimney was added. The body was painted to simulate rusted metal, and the whole was finished with a brown wash. Hut 3:
The door is corrugated shee, and the. doorframe is made from scrap balsa . The roof is pieces of craft sticks and corrugated card, with a drinking straw chimney. I sprayed the hut grey and highlighted it in brown and ivory. The doors and metalwork were painted gunmetal, and weathered. Now paint and flock your bases, and you're done. |

 The door was made from a piece of Balsa wood, scored with a pencil simulate planks.

 I covered the walls with corrugated card, for a 'post apocalypse' look.
  I covered the walls with sections cut from craft sticks.